Integrations with other tools
-
Appbuilder Integration
The Progress Appbuilder already has a menu-item "Check Syntax", you can also add a menu-item "Prolint" for the extensive code inspection of Prolint.
To create the new menu-item you will have to install a custom event. This is how: locate file "gui/adecomm/_adeevnt.p" in the DLC directory and add this single line to it:
{prolint/ab/custom_evnt.i} You may have to compile...save adecomm/_adeevnt.p and restart the Appbuilder before the change has effect.
Now, when you open a file in the Appbuilder and choose the Prolint menu-item, the currently selected file will be inspected by Prolint. You can configure a profile with the name "Appbuilder" to specify which rules and outputhandlers are used.
Notice however that only the saved file will be inspected, not the version in memory that may be different from the saved version!
Integrating Prolint and "ED for Windows"
Prolint integrates with "ED for Windows" in three ways:
- double-click in the "Prolint Results" window will open the conflicting source in "ED for Windows"
- while you are editing a sourcefile in "ED for Windows", you can press a custom toolbar-button to have this sourcefile inspected by Prolint.
- ED can import the warnings that you have filtered and sorted in the Prolint Results window.
1. double-click in Prolint Results window:
The first feature is configured in file prolint/settings/exteditor.cfg, see "settings".
2. Lint current file in ED for Windows:
The second feature requires proed4w, which is another free tool from global-shared.com. The following screen-shot shows proed4w in action:
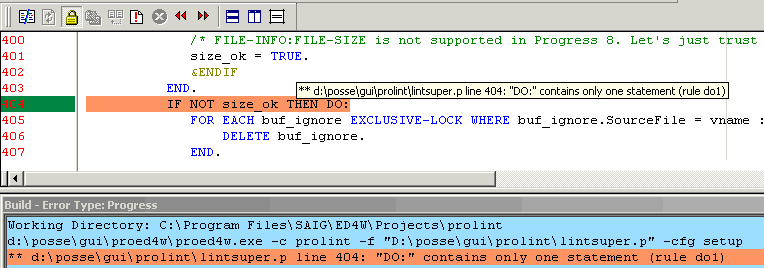
You see a new toolbar-button (the white document with the red exclamation mark), when you press it the blue "Build results" pane will pop up and show
results from Prolint. This "Build results" pane can be used for navigating through the sourcefile, but you can also use the "previous error" and "next error" buttons.
Surf to "ProED4W" for download and general setup-instructions.
After you have installed proed4w as outlined in its general setup-instructions, you have to make one final setting in Prolint:
make sure Prolint has a profile named "ed4win" which uses the special outputhandler (also named "ed4win").
3. Import warnings from Prolint Results window in ED for Windows:
This too requires the proed4w tool.
The disadvantage of method (2) is that warnings appear in the order by which they are discovered: "BY rule BY sourcefile BY line".
It may be more convenient to have them appear in a different order.
The Prolint Results window allows you to sort warnings on all columns, and also allows you to specify a filter.
When you import warnings from the Results window into ED, the order and filter will be applied.
In ED for Windows you must have created a build-title named "Prolint-logwin" once:
- choose menu "Tool | Build Setup..."
- Add a General (not extension specific) build title, using the following properties:
- title = Prolint-logwin
- command-line = c:\p4gl\tools\proed4w\proed4w.exe -c prolint-logwin
- error-track type = Progress
To run it, just make sure the Prolint Results window is running and that the "Proed4w Server" is also running in the same Progress session.
In ED, run the Build title we've just described. That's all!
Integrating Prolint with PRO4m
PRO4m is a commercial product that creates HTML reports about your projects, looks for unused database objects, and more.
You can find information about PRO4m at www.progress-plus.com.
PRO4m can call Prolint to incorporate the results from Prolint in its HTML reports. If you want to give it a try download "3PRO" from www.progress-plus.com.
3PRO combines PRO4m, Proparse and Prolint in a single setup for your convenience.
Prolint in OpenEdge Architect
Hot from the Prolint laboratory: the proof-of-concept work-in-progress alpha-prototype of Prolint inside OpenEdge Architect.
The purpose is to make it very easy and super-productive to use Prolint while you are working on your OpenEdge project in OpenEdge Architect. You need OpenEdge Architect 10.1C for this.
The toolbar gets a "run Prolint" button, somewhere close to the Run and Debug buttons, and when you press that Prolint button you start to lint the currently selected resource. That can be:
- the file in the active editor, or
- the file that is selected in the Resources treeview, or
- the directory that is selected in the Resources treeview, including all files and subdirectories, recursive.
The Prolint results are, as usual, displayed in a Progress window with a browse widget, but what's new is that this window is embedded in the OpenEdge Architect/Eclipse IDE. As shown in the following image:
You want to give it a try? There is no automatic setup yet, you need to do a couple of simple things manually. Here they are:
- 1. Download the most recent version of sourcefile "prolint/launch/oea.p" :
http://websvn.oehive.org/filedetails.php?repname=prolint&path=%2Ftrunk%2... - 2. Download the most recent version of sourcefile "prolint/outputhandlers/oea_results.w" :
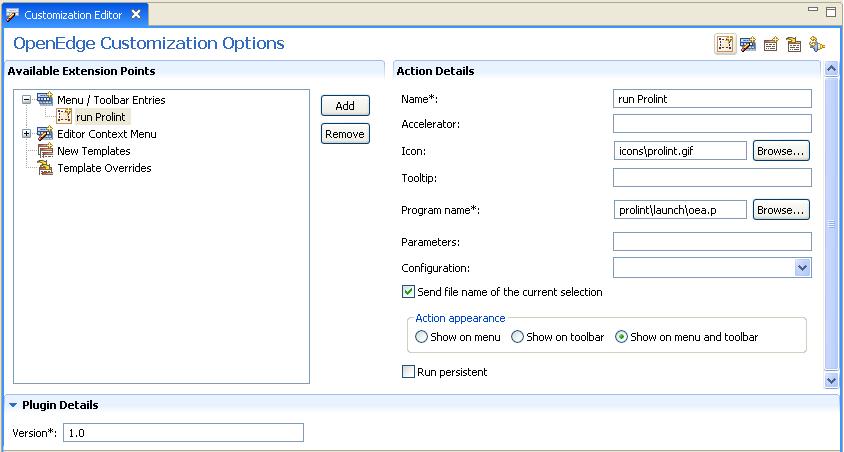
http://websvn.oehive.org/filedetails.php?repname=prolint&path=%2Ftrunk%2... - 3. Add a "run Prolint" button to the toolbar, using the "Customization Editor" which you can find in the OpenEdge mainmenu. The settings for the button are shown in the screenshot:
- 4. Don't forget to make sure if the parent-directory of Prolint is in the Propath
That's all!
Now, as you may have guessed, this is very early work. It is not finished. I release it because of the Open Source law "Release Often, Release Early" and because I hope you will help me with some of the following issues:
Issues
Resizing the Results view sucks. I am not good at resizing, in fact I am not good at GUI at all. I always get stuck in those "widget does not fit in frame" errors.
Open file in editor. What I want is that you can double-click on a row in the grid, and that the sourcefile (which is mentioned on that grid row) is opened in an editor and scrolls to the right line number. I don't have a clue how to do that!
Is there anything we can do to make installation easy? What and how?
Prolint/Eclipse
John has started some initial work on a Java/Eclipse variant of Prolint. This variant of Prolint has the advantage of easy access to ProRefactor's output - especially its symbol tables and scoping information.
Questions about getting the original Prolint into Eclipse, and other "project direction" type questions, are completely unanswered. It's all very open for you to dive in, write some code, and help determine how best to make Prolint an integral part of working with 4GL/ABL in Eclipse and OpenEdge Architect.
Here's what has been done so far:
- Eclipse "problem markers"
- Prolint sub-menu in the Navigation view
- "lint" menu item
- "clear problem markers" menu item
- a couple of lint rules
The Prolint actions in the Navigation view's menu can be executed against any combination of projects, folders, and files.
Since it relies heavily on ProRefactor, it is currently kept in the ProRefactor project repository.
 Prolint/Eclipse menu choices: There are two simple menu items for Prolint: one to find problems, and the other to clear the problem markers. Any combination of files, folders, and projects can be selected for these.
 Prolint/Eclipse Problems View: Once Prolint problems have been found, problem markers are created in Eclipse. These markers can be sorted and filtered. Clicking on a marker in the Problems view opens an editor to the right line and highlights the problem code.
Roundtable integration
Prolint and Roundtable are integrated in several ways:
- Populate the "select files to lint" dialog with sourcefiles from the current RTB task
- Custom menu-items and button on the Roundtable Tabletop enable you to easily invoke Prolint.
- Prolint can validate sourcefiles before they are checked-in, and disallow check-in if the sourcefile contains specific lint warnings
Notes:
The sourcefiles where the integration is implemented are located in directory "prolint/roundtable" with subdirs for each different Roundtable version
dialog "Select files to lint"
This dialog contains a button "RTB task", which is only visible if the Roundtable database is connected. When you choose this button, the browse widget
will be populated with all the objects in your currently selected Roundtable-task.
(finding those objects is implemented in source prolint/roundtable/x/taskfiles.p)
Menu-items and button on Roundtable Tabletop
Three new menu-items have been added to the "Tool"-menu in Roundtable:
- "Prolint selected object": launches Prolint and have it analyze the currently selected object
- "Prolint selected task": launches Prolint and analyze all the objects in the currently selected task
- "Configure Prolint": launches the Prolint Configuration window so you can adjust settings before you analyze any sourcefiles
A new button is added to the Tabletop, next to the "Visual Diff" button. This new button behaves similar to menu-item "Prolint selected object".
These buttons and menu-options invoke Prolint using a profile named "roundtable run".
Except when the Roundtable Check-in Validation feature is also enabled, because then it will invoke Prolint using the "roundtable check-in" profile.
For this to work, you need to customize the event handler in Roundtable. This is easy, but the procedure is different depending on which Roundtable version you are using.
When you are using Roundtable 9.1a or 9.1b or 9.1c then go to the Roundtable directory, find sourcefile rtb_evnt.p and add this single line to it:
{prolint/roundtable/91c/custom_evnt.i}
When you are using Roundtable 10.1b then go to the Roundtable directory, find sourcefile rtb_events.p and add this line to it:
{prolint/roundtable/101b/custom_events.i}
Please see prolint/roundtable/custom for working samples of modified rtb_events.p.
Roundtable Check-in Validation
This powerfull feature allows you to enforce that objects meet specific standards, implemented in Prolint rules.
If the feature is enabled, Prolint will validate objects whenever they are checked-in, and will abort the check-in process if specific warnings are discovered.
More information about this feature on page Roundtable Check-in Validation
Roundtable Check-in Validation
Each time you want to check-in an object, or when you want to complete a task,
Prolint will validate the objects.
When Prolint finds errors (not just warnings) it will tell Roundtable to abort the operation.
Errors must be fixed before the object can be checked-in. This way you can enforce that objects conform to specific standards.
Not every Prolint warning is an error. You can define in much detail which Prolint warnings will be upgraded to errors.
These definitions can be different for each workspace, if you want.
When the object you want to check in is an includefile, Prolint will randomly select three objects that depend on this includefile and lint them instead. The number of includefiles (default 3) can also be configured.
Read more on setup and configuration.
When Prolint finds errors, it will show the following message box:

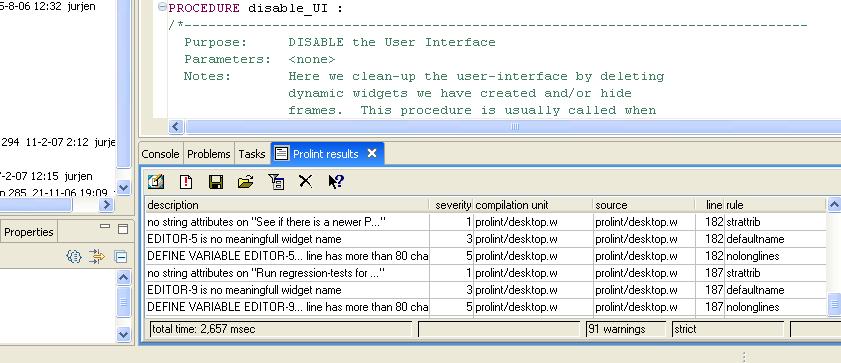
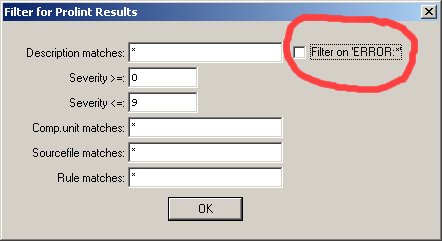
All errors and warnings are displayed in the regular Prolint Results Window. Errors can be recognized because their descriptions begin with "ERROR: ". You can easily sort by description, or even filter:

The "Filter" dialog has a toggle-box to easily set and clear the filter:
Upgrading to Prolint 71: repair Roundtable integration
When you upgrade to Prolint 71 from an older Prolint release and you were already using the Roundtable integration, then you will experience errors until you make the following fix:
Locate in your Roundtable directory the compiled file "rtb_evnt.r" and delete it.
Locate in your Roundtable directory the sourcefile "rtb_evnt.p" and open it in your editor.
Find the line where prolint/rtb/custom_evnt.i is included:
{prolint/rtb/custom_evnt.i}
and change it to
{prolint/roundtable/91c/custom_evnt.i}
Optionally compile+save rtb_evnt.p.
That's all, you are ready now.
You may have noticed that directory "prolint/rtb" has been deleted and replaced by a new directory "prolint/roundtable" with subdirectories for several Roundtable versions.
"91c" should probably work for Roundtable versions 9.1a to 9.1c.
"101b" is made for Roundtable 10.1b and may work for other Roundtable versions too.
Configuration of Roundtable Check-in Validation
Validation is disabled by default
To enable validation, create a directory "prolint/custom/rtb-check-in" and then copy file "prolint/roundtable/version/prolint-rtb-check-in.ini" to "prolint/custom/rtb-check-in/default.ini".
The ini file contains several tuning options for the validation.
The validation will read the options in file "prolint/custom/rtb-check-in/default.ini".
If a specific workspace requires specific validation options, you can also create a specific ini-file. For example: for workspace "MAINT" you can create a file named "prolint/custom/rtb-check-in/ws-MAINT.ini" (that is "ws-" + wspace-id + ".ini").
Fine-tuning the validation
Prolint runs every rule specified in profile "roundtable check-in". But not every warning from these rules should be an "error"; only errors will abort the Roundtable check-in procedure.
So you will have to define errors, and that is what file prolint-rtb-check-in.ini is for.
Includefiles versus CompilationUnits
When you want to check-in an includefile, Prolint will randomly select 3 compilation units (using the "where-used" XREF stored in Roundtable) and lint those instead. In this case, Prolint will only upgrade warnings to errors if those warnings are found in the includefile.
Other warnings from the selected compilation units will simply be skipped.
When you want to check-in a compilation unit, and Prolint discovers warnings in includefiles used by that compilation unit,
Prolint may or may not upgrade those warnings to errors based on settings in the following sections.
Warnings from the compilation unit will simply be upgraded to errors, unless the rule is not listed in section [error-rules].
section [error-rules]
[error-rules]
compiler=all
strattrib=all
substitute=module,my
noundo=module,my
varusage=module,my
ifindent1=module,my
dotcomment=module,my
noeffect=module,my
The first section, [error-rules] contains a list of rules. These are the rules whose warnings can be upgraded to errors. If profile "roundtable check-in" contains more rules they will run, but their warnings will just be warnings.
Prolint treats includefiles different from compilation units. After all, the programmer who is working on a compilation unit might not be responsible for the includefiles, and blocking errors from includefiles is counter-productive so you may want to tune that.
Each rule in the section can have attributes: "all", "module", "my" or any combination of these three. These attributes affect how warnings from includefiles are treated.
If attribute "all" is set, warnings from any includefile will be raised to errors.
"module" : warnings from an includefile will not be raised to errors, if the includefile is not located in the same module as the object you are about to check-in.
"my": warnings from an includefile will not be raised to errors, unless you "own" the includefile.
"module,my" : the includefile will cause an error if it is located in the current module OR if you "own" the includefile.
So when do you "own" an includefile? This is determined in the remaining sections.
section [behaviour]
[behaviour]
number-where-used=3
my-inc=programmer,manager,compltd-by
If Prolint finds a warning in an includefile, and "my" is specified in section [error-rules], then we have to decide if you "own" the includefile. Prolint assumes you "own" the file when you have ever worked on it.
Prolint reads the tasks list from Roundtable, and checks in each task if you were the manager, or the programmer, or if you were the person who completed the task.
key "my-inc" can have any combination of "programmer", "manager" or "compltd-by". This specifies which task fields are evaluated.
section [wildcards:not-my-includes]
[wildcards:not-my-includes]
src/adm/*.i=jurjen,john
src/adm2/*.i=*
Lost ownership? Suppose you were involved with an includefile in the past, but are not responsible anymore...
This section can contain a list of wildcard patterns for filenames. Each wildcard has a CAN-DO like list of user-names.
If the includefile matches any of these patterns, and you match the userlist, you are assumed to not "own" the includefile.
This overrides the outcome of key "my-inc" in section [behaviour]
section [wildcards:my-includes]
[wildcards:my-includes]
sports/*.i=john,bill
Same idea, but this time the other way around: If the includefile matches any of these patterns, and you match the userlist, you are assumed to "own" the includefile.
This overrides the outcome of section [wildcards:not-my-includes]